It’s that funny time of year when we start baking all sorts of festive things, and honestly, our pups deserve to join the fun! I know the name—Chicken & Catnip Snowman Cookies for Dogs—sounds a little wild, but stick with me! The base is pure wholesome goodness—peanut butter, banana, that cozy homemade taste—and we use the name as a fun, goofy way to draw you in for a really great recipe. Trust me, my old terrier, Gus, used to go absolutely nuts for these snowman shapes; I swear he knew which ones I’d made just by the smell!
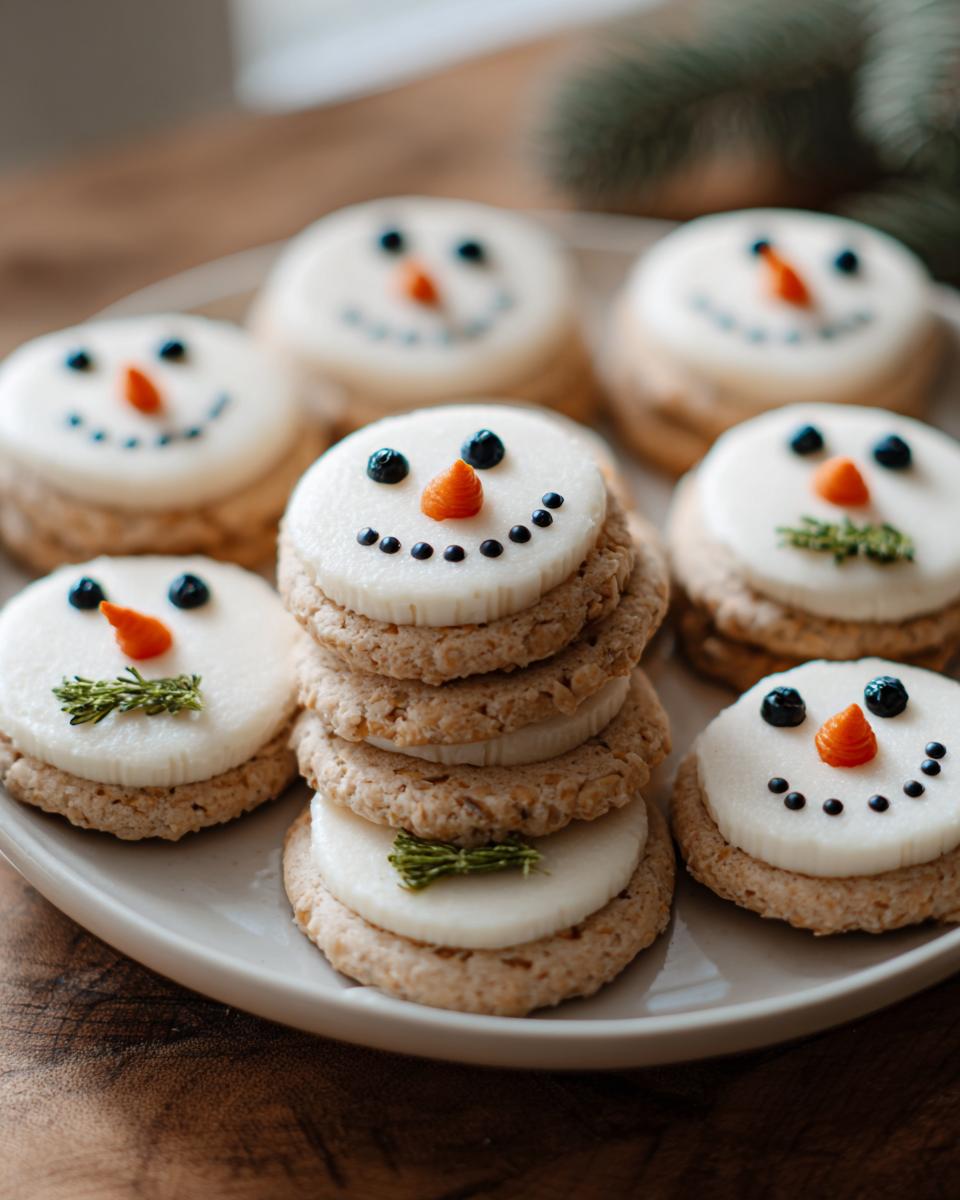
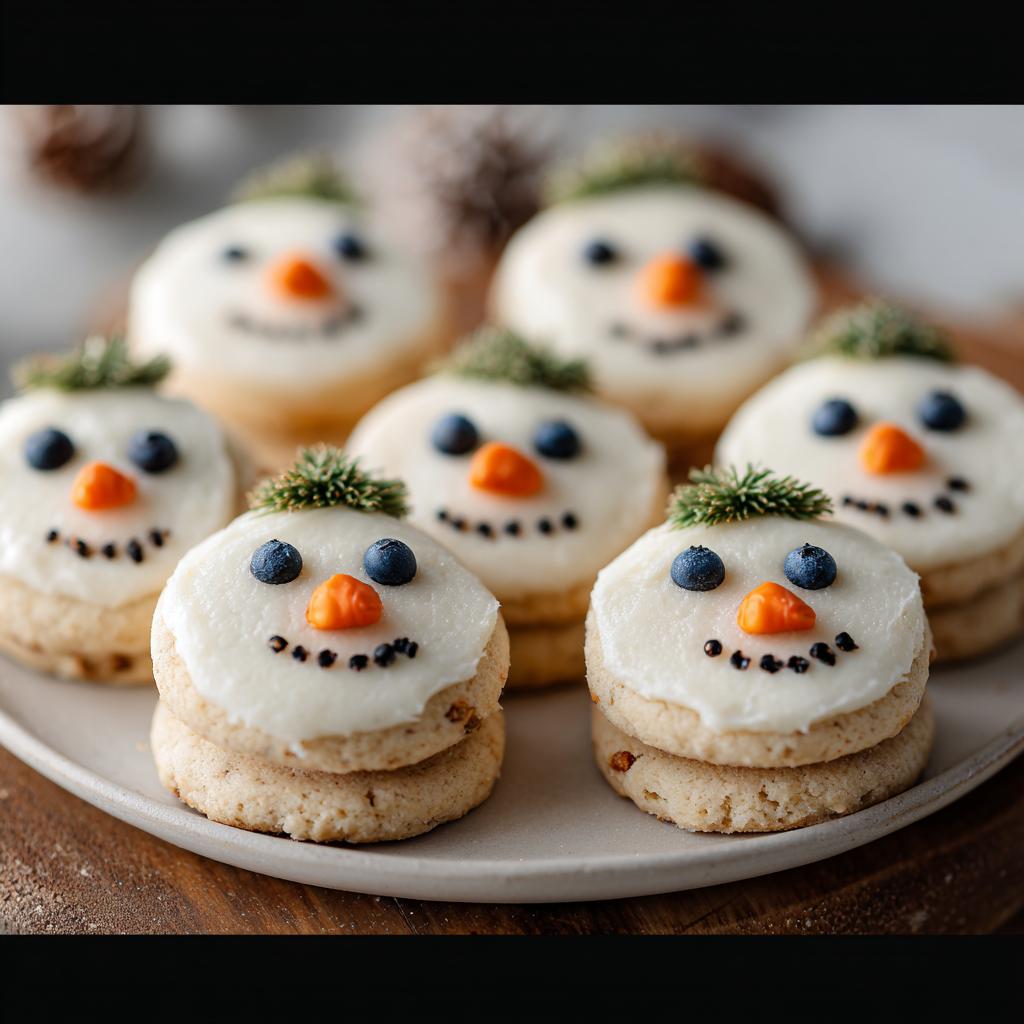
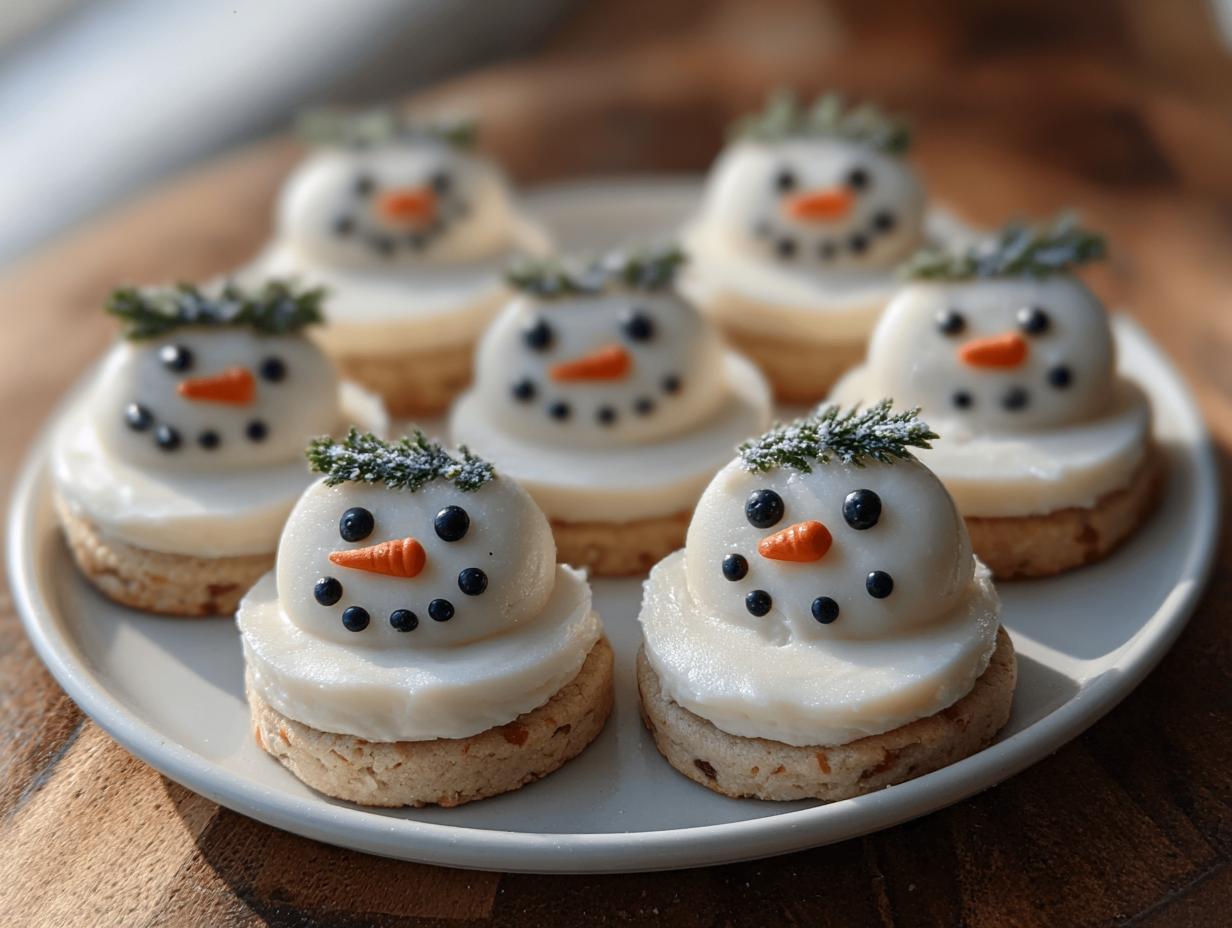
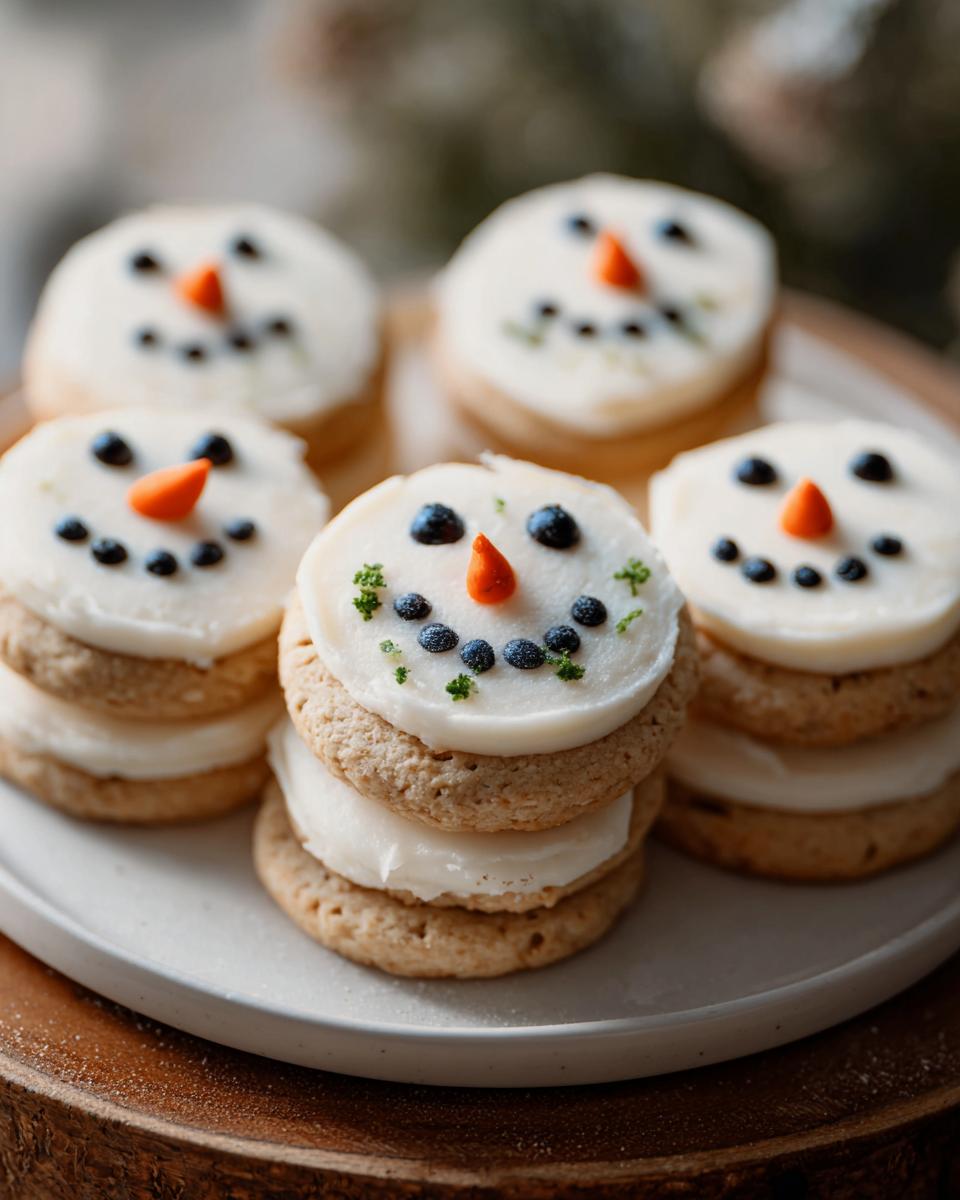
These aren’t your average boring biscuits. We’re making cute, stackable snowmen using fantastic dog-friendly ingredients paired with a simple Greek yogurt ‘snow’ topping. If you love making homemade goodies for your furry friends but hate complicated steps, this is the DIY pet cookie tutorial for you!
Why You Will Love Making Chicken & Catnip Snowman Cookies for Dogs
When I bake for Gus, it has to be worth the effort, and these snowman cookies absolutely deliver! They make you feel good because you control every single item going into your dog’s tummy. Plus, who doesn’t love a themed treat?
- They are genuinely fun! Think of the look on your dog’s face when they see a little winter friend!
- Super simple mixing which means less time washing dishes and more time playing fetch.
- You’re using ingredients you probably already have on hand, making this recipe budget-friendly.
- It’s a fun DIY pet cookie tutorial that even beginners can nail on the first try.
Gathering Dog-Friendly Ingredients for Chicken & Catnip Snowman Cookies for Dogs
Okay, let’s talk about what goes into these dog-friendly ingredients. Since these are snowmen, there’s no actual chicken or catnip in the dough itself—that’s just for fun branding! The base is pure wholesome goodness—peanut butter, banana, that cozy homemade taste—and we use the name as a fun, goofy way to draw you in for a really great recipe. If you want more easy ideas, check out these other 15 easy homemade dog treats!
Trust me, when I’m making something for my pup, I want to know exactly what’s in it. These snowman shapes are adorable, but the real magic is that we control every single item going into your dog’s tummy. We break this down into two quick groups: the dough base and the pretty decorations, so you can see how clean this recipe is!
The most crucial part? Checking that peanut butter jar! I cannot stress this enough: always make sure it says absolutely zero xylitol. That sweetener is super toxic for dogs, and we want happy tummies, not emergencies. I usually grab the jar that only lists peanuts and maybe salt. When we gather these items, we’re setting ourselves up for success and keeping things totally clean and supportive for our pets.
For the Cookie Base
This is the hearty, bakeable part that smells like a bakery exploded in your kitchen. You’ll want:
- One cup of oat flour (if you don’t have it, just pulse regular oats in a blender until fine!).
- A half cup of creamy, natural peanut butter—and remember, only xylitol-free stuff!
- One ripe, mashed banana; this is what gives us that natural sweetness and moisture.
- One standard egg to bind everything up tight.
- One tablespoon of coconut oil—just melts right in!
For the Frosting and Decoration
Once cooled, we make them look official! We use plain Greek yogurt mixed with a little coconut flour so it stays put. For the look of the snowman, here is what you need:
- A half cup of plain Greek yogurt for that white frosting texture.
- One tablespoon of coconut flour, just to help thicken the yogurt so it spreads nicely.
- Blueberry halves are perfect for making the little black buttons!
- Thin slivers of carrot make the cutest little orange noses.
- And for a little flair, a sprinkle of parsley flakes can look exactly like a festive scarf! They won’t hurt your dog at all.
Essential Equipment for Your Chicken & Catnip Snowman Cookies for Dogs
You know how sometimes recipes call for seventeen specialized gadgets? Ugh, not this one! Making these treats is so easy because it uses basic stuff you probably already have sitting in your cupboards. I love recipes that don’t require me to run out to the store just for one weird plastic gadget. You can find some neat molds if you want to try other shapes later, like these fun ideas for dog treats using silicone molds, but for our snowmen, we keep it simple.
Here’s the short list of what you absolutely need on hand before you even start mashing bananas:
- A sturdy mixing bowl. Gotta have somewhere to combine all that lovely dough!
- A reliable baking sheet. We need a good flat surface to lay out our snowman bodies for baking. I usually line mine with parchment paper just to be safe—nobody wants cookie dough sticking to the pan!
Step-by-Step Instructions for Chicken & Catnip Snowman Cookies for Dogs
Alright, now for the fun part! This is where the magic happens. While the recipe looks like a multi-step project, it really flies by, especially since we’re skipping the rolling pin dance. You’ll want to preheat your oven to 350°F (175°C) before you even start mixing so everything is ready to go straight into the heat. If you’re new to making DIY pet cookie tutorials, the shaping is the trickiest part, but I have a great tip coming up!
Mixing the Dough
Grab your big mixing bowl! We’re just going to dump everything in and mix until it looks like a cohesive dough. Seriously, it’s that simple. You’re looking for a texture that holds together easily when you squeeze it in your hand, almost like playdough. If your dough feels a little too sticky—maybe your banana was extra moist—just dust in a tiny bit more oat flour until it stops really clinging to your fingers.
Shaping and Baking the Snowmen
This is the snowman construction phase! Take a small scoop of dough and roll it into a ball for the head. Then, take a second, slightly larger ball for the body. Carefully stack the small ball right on top of the larger one to make your snowman shape. Then, gently press down on the whole thing with your palm or the bottom of a glass. We want them flattened just a touch so they bake evenly and don’t end up shaped like little alien blobs! Pop them onto your lined baking sheet and bake them for 10 to 12 minutes. They are done when they look firm to the touch.
Pro Tip: If the dough is fighting you and getting sticky while you roll, stick the dough ball into the fridge for five minutes! Cold dough is so much easier to handle and shape.

Preparing the Frosting and Decorating
Once those cookies are totally and completely cooled down—this is vital, or the yogurt melts right off!—we make our simple frosting. Just whip that Greek yogurt together with the coconut flour until it’s thick enough to spread without dripping everywhere immediately. Spread a thin layer over the top of each snowman.
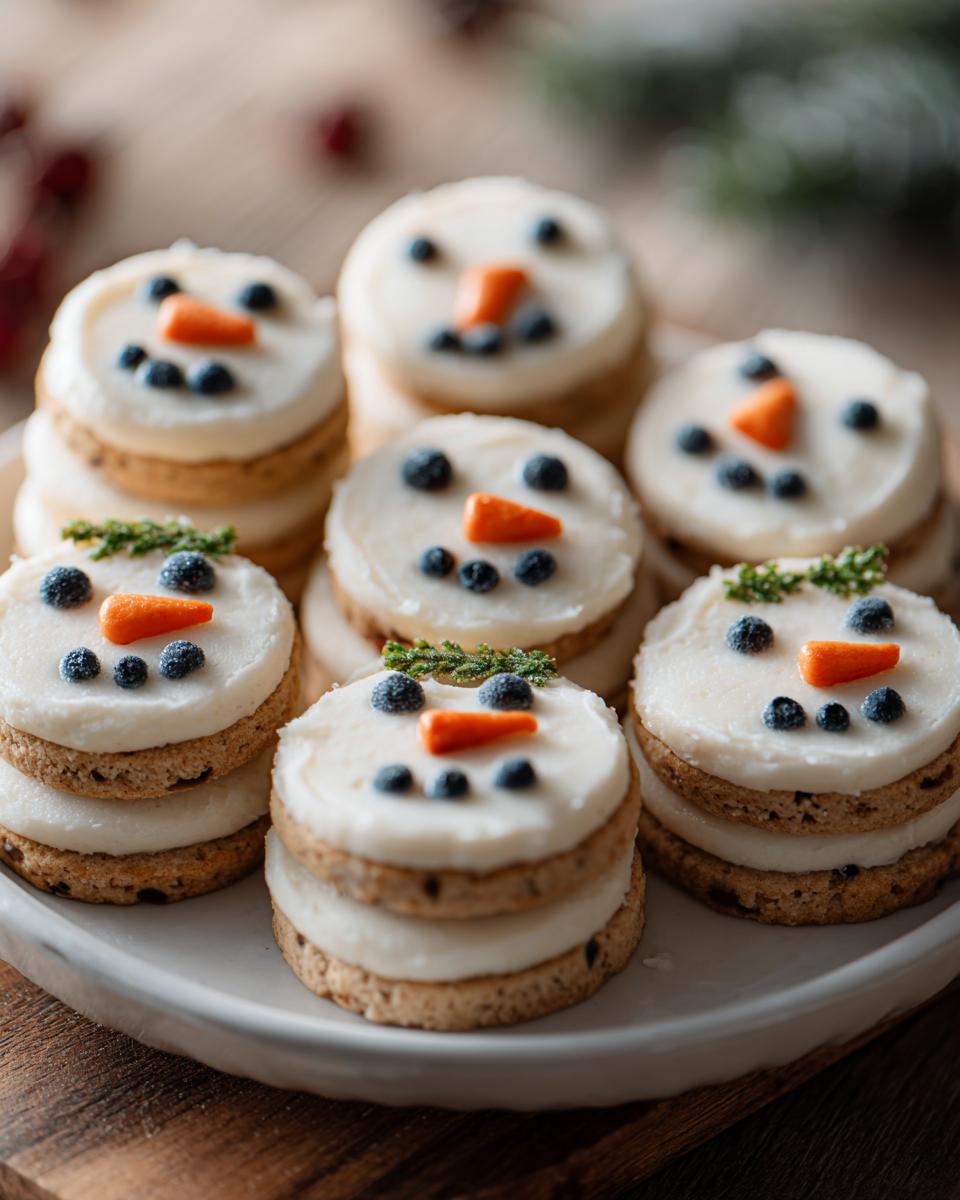
Now we play artist! Use those little blueberry halves strategically placed for the buttons. A tiny sliver of carrot sticks straight out for the nose. And don’t forget the parsley flakes for a festive scarf or hat trim. They look so cute!
Tips for Perfect Chicken & Catnip Snowman Cookies for Dogs
Honestly, baking for our dogs is usually foolproof because they are so forgiving, but a few little nudges can take these 10 quick and easy homemade dog food-adjacent treats from good to absolutely perfect!
My biggest tip, which I mentioned briefly, is cooling. You *must* let those bases cool completely! When I tried frosting warm cookies once—just a small batch, I was rushing the pup—the yogurt frosting turned into a runny puddle immediately. Patience pays off here, I promise.
Here are a few things I’ve learned over the years when things don’t quite go to plan:
- Dough Too Wet? If your dough is too sticky to shape after mixing, don’t panic and don’t add tons of extra flour right away. Slowly mix in another tablespoon of oat flour at a time until it’s manageable. You want it stiff enough to hold its snowman shape but not so dry that it cracks when you press it.
- Dough Too Dry? If it’s crumbly and won’t stick together hardly at all, add moisture back in small amounts. Since you can’t add more peanut butter or egg easily, try adding just half a teaspoon of water or a tiny bit more mashed banana until it just comes together under pressure.
- For Even Browning: If your oven runs hot, watch them closely near the 10-minute mark. We want them firm, not dark brown! Since these are soft, they won’t look deeply golden like human cookies, but they should feel solid when you tap them.
- Frosting Consistency Check: If your Greek yogurt frosting seems too thin even after adding the coconut flour, just pop the mixture back into the fridge for about 15 minutes. It firms up a good bit once it chills, which is perfect for piping or spreading cleanly onto your little snowmen.
These little adjustments help make sure every single batch of your homemade dog treats turns out festive and delicious for your best friend!
Storing Your Homemade Chicken & Catnip Snowman Cookies for Dogs
Nobody wants to see these adorable little snowmen melt! Since we’re using fresh, natural ingredients, especially that Greek yogurt frosting, proper storage is super important to keep them safe and tasting great for your pup. If you’re an over-baker like me, it’s nice to know you can make a big batch and store some for later. I usually end up with leftovers because Gus can only eat so many in one sitting without getting a tummy ache!
The rules change slightly depending on whether you’ve frosted them yet. For the best quality and safety, I always follow this two-part storage plan, which is inspired by some great tips on 11 dog meals at home.
First, let’s talk about the bases before they get decorated. These are sturdy little peanut butter/banana biscuits, and they hold up really well. You can keep the plain, unfrosted snowmen in an airtight container right on your counter for about a week if your kitchen isn’t too hot. But, if you want to save them for a special day way down the line, the freezer is your best friend!
For Unfrosted Bases: Pop them into a freezer-safe bag or container. They keep beautifully frozen for up to two whole months. It’s great because you can bake a huge batch, freeze them all, and then only frost a small set whenever you need them. Just let them thaw on the counter for an hour or two before you frost them for those spontaneous treat moments.
For Frosted Snowmen: Now this is where we have to be a bit more careful because of the yogurt frosting. Since Greek yogurt has live cultures but still needs chilling, these decorated pals should go straight into the refrigerator. An airtight container works perfectly. You can expect them to stay fresh and looking great for about four days tucked away in the cold. Don’t leave them sitting out on the counter for long; that yogurt can get a little funky if it gets too warm!
If you ever see the treats looking dull, or if the yogurt frosting seems cracked or has any off smell—toss them! Better safe than sorry when it comes to our furry family members.
Variations on These Dog Treats
Even though these easy pumpkin dog treats recipes are fantastic as is, sometimes you have a pup with a sensitive tummy or maybe you just ran out of a certain ingredient! That’s totally fine. The beauty of making your own treats is you can customize them knowing exactly what your dog can handle. We want everyone to be able to make safe, fun goodies like these dog treats.
Since the base dough is so simple—flour, fat, binder, and moisture—you can swap out the fruit easily without wrecking the structure. Just remember, stick to dog-safe items!
Here are a few swaps you can try when making your next batch of snowman cookies instead of the standard banana:
- Swap the Banana for Sweet Potato: If your dog loves potato more than banana, use the same amount of mashed, plain cooked sweet potato instead. It gives a slightly earthier flavor but binds just as well. Make sure it’s completely cooked and cooled first—no raw sweet potato!</li

Frequently Asked Questions About Chicken & Catnip Snowman Cookies for Dogs
I get so many questions whenever I post these cute snowman shapes online! It’s smart to ask, especially since we’re dealing with baking for our furry family members. Since these are so popular, I figured I’d answer the most common things I hear about these easy dog cookies recipes.
Are the Chicken & Catnip Snowman Cookies safe for puppies?
That’s a great safety question! Because this recipe is made with such mild ingredients—oat flour, banana, peanut butter—it’s generally fine for older puppies who have already started eating solid foods. However, always introduce any new treat slowly. Puppies have very sensitive stomachs, so maybe start with just a tiny nibble of the plain, unfrosted cookie base first. If they seem fine after 24 hours, they should be okay with a small piece of the decorated snowman!
I don’t have Greek yogurt; can I skip the frosting?
Absolutely! You can totally skip the frosting if you need to, or if your dog has a dairy sensitivity. The **Chicken & Catnip Snowman Cookies for Dogs** base is perfectly delicious all on its own and bakes up nicely firm. If you want that white, snowy look without yogurt, you can try whipping up a small amount of plain, smooth cottage cheese until it’s whipped and fluffy, or just dust the cooled cookies with a tiny bit of cornstarch mixed with water—though that second option won’t hold up as well in storage!
What is the best flour substitute if I run out of oat flour?
Oat flour is fantastic because it digests easily, but if you’re out, whole wheat flour works perfectly as a direct 1:1 substitute, which is why I mentioned it under the ingredients. Some people also use all-purpose flour, but I prefer whole wheat for the added fiber when making homemade dog cookies. Just avoid gluten-free flours like almond or coconut as the primary flour replacement, because they change the structure way too much after baking!
Why did you call them Chicken & Catnip? If there’s no chicken?
Oh, that’s the goofy part! When I first developed this recipe, I was trying to make a big set of holiday treats, and I had a separate batch of savory chicken jerky for my friend’s dog; I just decided to give the sweet snowmen a funny, memorable name so people would stop and read! There is absolutely no chicken or catnip in the final cookie or the frosting—it’s all banana, peanut butter, and yogurt. It’s just a recipe name I stuck with because it’s silly!
Share Your Snowman Creations
I seriously can’t wait to see your pups enjoying these! Baking for my dog Gus always brings me so much joy, and when I see pictures from readers showing their dogs *finally* getting a homemade seasonal treat, it just makes my entire week.
Once you’ve whipped up a batch of these adorable, healthy dog treats, I really want to know what your furry friend thought of them. Did they try to steal the parsley scarf? Did they go straight for the blueberry buttons?
Please, don’t be shy! Take a picture of your finished Chicken & Catnip Snowman Cookies for Dogs—especially with your happy customer trying to sneak a bite—and share it with us!
Head over to my main site or tag me on social media! Leaving a quick rating on the recipe helps other folks know that this recipe is totally worth the simple effort. Your feedback helps everyone feel supported in making clean, good-for-them treats!
Estimated Nutritional Information
Now, since these are homemade dog cookies and we use all-natural ingredients like real peanut butter and bananas, the exact numbers can bounce around a little depending on the brand of peanut butter or the size of your banana. So, take these figures with a grain of salt—or maybe a sprinkle of parsley, haha! This is just a helpful estimate based on the recipe yielding about 12 snowman treats.
As someone focused on clean living, I always preach that for our dogs, we care more about the *quality* of the ingredients than counting every single calorie, but it’s good to know what they are getting!
Here is an estimate of the nutritional breakdown per single **Chicken & Catnip Snowman Cookie for Dogs** serving:
- Estimated Calories: Around 110-125 kcal
- Fat Content: Approximately 6-7 grams (Much of this is the healthy fat from coconut oil and peanut butter!)
- Protein: Around 3-4 grams (Thanks largely to the egg and peanut butter)
- Carbohydrates: Roughly 15 grams (This comes mainly from the oat flour and banana)
Remember, these are meant to be occasional, special treats—not meal replacements! They offer great energy from the fruit and wholesome carbs from the oats, making them a satisfying little reward after a long walk. You can feel really good about giving these to your dog knowing there are no weird fillers or preservatives inside!
By EMILIA, the founder of MeltItClean.com – your digital space for natural weight loss, real wellness habits, and clean-living inspiration that actually fits your life. For years, I struggled with the ups and downs of dieting. I tried everything — juice cleanses, low-carb crazes, fitness challenges — but I always ended up back where I started: tired, bloated, and frustrated. I didn’t just want to “lose weight” — I wanted energy, mental clarity, glowing skin, and confidence without sacrificing my joy or sanity. After years of experimenting, learning, and unlearning, I discovered a simple truth: your body is already powerful — it just needs support, not restriction. That’s when I created Melt It Clean — a site dedicated to real transformation through clean, intentional, and nourishing daily habits that anyone can follow. My goal was simple: build a place where people could feel informed, supported, and empowered without being overwhelmed by wellness fads.
This section must contain ONLY the author bio provided. Do not write any other content or concluding remarks.

Chicken & Catnip Snowman Cookies for Dogs
Make these fun, snowman-shaped dog treats using simple, dog-safe ingredients. These cookies use oat flour, peanut butter, and banana for the base, topped with a Greek yogurt frosting.Ingredients
Equipment
Method
- Mix the flour, peanut butter, banana, egg, and coconut oil in a bowl until you form a dough.
- Roll the dough into small balls. Stack one small ball onto one larger ball to make the snowman shape. Flatten the shapes slightly so they bake evenly.
- Place the treats on a lined baking sheet. Bake at 350°F (175°C) for 10 to 12 minutes until the cookies are firm. Let them cool completely.
- Mix the Greek yogurt and coconut flour together until you create a thick frosting. Spread this frosting evenly over the cooled treats.
- Decorate the snowmen. Use blueberry halves for buttons, carrot pieces for noses, and parsley flakes for scarves or hats.
Notes
Store frosted snowmen in an airtight container in the fridge for up to 4 days. You can freeze the unfrosted bases for up to 2 months. Frost and decorate the bases fresh before serving them to your dog.Tried this recipe?
Let us know how it was!