We all want to give our furry friends the best, right? Sometimes that means checking every ingredient label at the pet store, and honestly, it’s exhausting trying to find something truly clean. That’s why I always circle back to simple, whole ingredients. If you’re like me—always searching for nourishing habits that don’t feel like a chore—you’re going to love this recipe for Carrot & Oat Dental Sticks. They are ridiculously easy to whip up, use ingredients I already have on hand, and they give me total peace of mind knowing exactly what’s in them.
When I first started MeltItClean.com, my focus was on detoxing my own plate, but it quickly became clear that clean living applies to our whole house, including the pets! Commercial treats often sneak in fillers or artificial bits that totally counteract the healthy changes I’m making for myself. These carrot and oat sticks are my go-to snack solution because they prove that real transformation, whether for weight loss or wellness, starts with intentional, simple choices. You don’t need a huge kitchen or hours of time to feed your dog something terrific, trust me on this one.
Defining the Target Audience for Carrot & Oat Dental Sticks
So, who exactly needs these incredible Carrot & Oat Dental Sticks in their life? Mostly, it’s for my fellow pet parents who look at ingredient labels and immediately feel overwhelmed or suspicious. If you’re trying to keep things clean in your own kitchen—like I am over at MeltItClean.com—you want that same transparency for your pups!
These sticks are perfect if you’re deeply concerned about artificial colors, weird preservatives, or corn fillers in big-brand dog snacks. They’re wonderful for folks managing mild sensitivities because carrots and oats are such simple players. And let’s be honest, anyone looking for a crunchy, satisfying texture that might help keep things a little cleaner between dentist visits will love this homemade approach. If you’ve seen my tips on getting started with dog treats using silicone molds, you’ll realize how simple it is to make something fantastic like these!
Tone and Style for Making Carrot & Oat Dental Sticks
When we talk about making these Carrot & Oat Dental Sticks, I want you to feel totally relaxed, like we are hanging out in my kitchen on a Saturday morning. My tone is always friendly and encouraging because I know how intimidating baking can sometimes feel. We’re going for crystal-clear instructions—no industry jargon here!
The style is direct and action-oriented. I’ll tell you exactly what to do and why it matters because that trust (that E-E-A-T feeling!) is everything when you’re feeding your best friend. It’s all about making clean habits easy, not complicated.
My Personal Journey with Carrot & Oat Dental Sticks
When I was waist-deep in my own restrictive dieting phase—trying every cleanse under the sun—I realized I was treating my body like an enemy that needed punishing! That harsh mindset bled over into how I looked at my dog, Buster. I was reading ingredients on his food labels and feeling that same panic I felt looking at a nutrition facts panel for myself.
I remember one day looking at a bag of brightly colored, strangely shaped commercial dog biscuits and just shaking my head. They were full of things I couldn’t pronounce. I thought, “Emilia, you’re dedicated to clean living, why are you letting this slide for the one creature who trusts you implicitly?” That was the moment I decided that if I couldn’t find a simple, trustworthy treat, I’d make one.
Creating these Carrot & Oat Dental Sticks felt like such a victory. It was proof that nourishment doesn’t need fancy additives; it just needs intention. If you’re also looking to simplify your pantry and embrace simple, natural treats, this recipe is your first happy step toward cleaner pet ownership!
Essential Ingredients for Your Carrot & Oat Dental Sticks
Okay, listen up, because this is where the magic—and the clean eating—really starts. When I set out to create a recipe for the Carrot & Oat Dental Sticks, I kept it super minimal, just like my philosophy for real wellness! We aren’t messing around with anything weird here. We want solid, honest ingredients that you can feel good about feeding your pup.
I adapted this concept from a simple veggie snack idea, focusing only on the elements that give structure and crunch. You absolutely need firm, vibrant carrots for this. If they look slightly sad, skip them. We need that crunch factor! For the oats, just stick to standard rolled oats; no need for fancy quick-cook stuff. You’ll find that these two ingredients alone create a fantastic base.

While the original notes had a ranch dip, we are focusing squarely on the stick itself here so we can control every single component. I’ve given you the starting point below, and remember, you can check out ideas for carrot and apple crunchies if you want a little extra fruit flavor down the line!
For the Carrot & Oat Dental Sticks Base
- Fresh Carrots (4 large): Make absolutely sure you choose firm, vibrant carrots. These are the backbone of our crunch!
- Rolled Oats (About 2 cups, adjust as needed): This is for structure and that satisfying, slightly chewy texture we need in a dental stick.
For the Optional Flavor/Binder (If Applicable to Carrot & Oat Dental Sticks)
Since we ditched the creamy ranch from the original idea to focus purely on the stick, we need something to hold that carrot and oat together so it doesn’t crumble into dust! A little bit of binding is necessary, depending on how moist your carrots are.
- Greek Yogurt (1 cup recommended): This acts as a fantastic, protein-rich binder. You want the creamy, non-fat kind if you’re watching calories, but full-fat works too for richness.
- Lemon Juice (1 tablespoon): This brightens the natural sweetness of the carrot and helps set the mixture slightly.
Step-by-Step Instructions for Perfect Carrot & Oat Dental Sticks
Alright, putting these Carrot & Oat Dental Sticks together is incredibly satisfying because you get to see the transformation happen right before your eyes. We’re sticking true to the clean-living philosophy here, which means no harsh chemicals, just elbow grease and good ingredients! Remember, the goal is a stick that has some satisfying density—not crumbly, but sturdy enough for a good chew.
If you’ve ever made my energy balls, the technique is similar, but we need a little more structure. Seriously, the quality of your ingredients matters here; mushy carrots mean a soft stick, and we want that enjoyable crunch! If you are looking for ideas on how to shape things, you might peek at how people handle banana carrot logs—it’s all about consistent sizing.
Preparing the Carrot & Oat Dental Sticks Dough
First things first, we need to process those vibrant carrots until they are super fine. You don’t want big, chunky pieces in a dental stick; we want them integrated into the dough. I use my food processor for this part—it’s so much faster than grating by hand! Pulse the carrots until they are almost like coarse wet sand. Not purée, but definitely finely shredded.
Next, that Greek yogurt comes into play. In a big bowl, mix your pureed carrots with the yogurt and lemon juice until it’s just barely combined. Now, add your oats slowly. This is the crucial moment for texture! You want to stir until a thick, slightly sticky dough forms. Be careful not to overmix here; we’re aiming for just enough binding so that when you press it, it holds its shape. If it feels too wet, add oats, one tablespoon at a time, until it stops sticking aggressively to your hands.
Forming and Setting the Carrot & Oat Dental Sticks
Now for the shaping! Because we aren’t baking these babies (we want that raw, fresh crunch!), the chilling process is like our oven setting. Take spoonfuls of the dough and gently roll them between your palms into thick sticks—aim for about 3 to 4 inches long and half an inch thick. Make them uniform so they dry out evenly during the chilling process.
Lining a baking sheet with parchment paper is non-negotiable; these are sticky! Place all your formed sticks onto the prepared sheet. They shouldn’t be touching too closely. Here’s the step that replaces the oven time: you need to chill these! Pop the tray into the deepest, coldest part of your fridge for at least 10 minutes. This allows the oats to absorb residual moisture and the yogurt to firm up. After 10 minutes, they should be solid enough to handle without losing their stick shape. Don’t skip this chill time, or they’ll turn into messy puddles!

Tips for Success When Making Carrot & Oat Dental Sticks
Achieving that perfect texture—the balance between dense and crunchy for our Carrot & Oat Dental Sticks—is all about ingredient quality and handling. Trust me, I’ve made batches that crumbled like sand and others that were too soft, so I learned the hard way!
The absolute key here is ingredient control. Make sure your carrots are really dry after washing; I even give mine a couple of extra pats with a paper towel after the ice bath soak. Excess surface water turns into mush when combined with the oats.
Also, when you are mixing in the oats, go slowly. You’re building structure, not making bread batter. If you dump all the oats in at once, you risk over-absorbing the moisture and ending up with stiff, cracking logs. It’s better to add them until the dough *just* starts holding its shape when squeezed. If you want a little extra chewiness that holds up well, especially if you’re interested in variations like carrot and sweet potato chews, make sure your yogurt binder is relatively thick!
Storage and Shelf Life for Homemade Carrot & Oat Dental Sticks
Since these Carrot & Oat Dental Sticks skip the baking process to keep everything raw and fresh, storage is super important. We have to manage moisture because oats are absolute sponges!
You must store them in a very airtight container; otherwise, the fridge air will make them get tacky fast. I recommend keeping them in the refrigerator for up to five days. If you make a big batch—and trust me, you will because they disappear quickly—toss them in a freezer bag. They freeze beautifully for up to two months! Just let them thaw on the counter for about 15 minutes before offering one to your happy pup.

Frequently Asked Questions About Carrot & Oat Dental Sticks
I always get so many questions when I post about my clean-living pet treats! It’s great that you’re being mindful about what goes into your dog’s diet. Here are some quick answers to the questions I hear most often regarding these crunchy Carrot & Oat Dental Sticks.
Are Carrot & Oat Dental Sticks Safe for All Dogs?
For most dogs, yes, they are fantastic! Carrots and oats are generally very easy to digest, which is why I love this recipe so much for daily snacking. However, if your dog has a known sensitivity to grains, you’ll need to skip the oats entirely and perhaps substitute them with ground flaxseed or use a different, grain-free binder. Also, always consider size! If you’re serving these to a tiny toy breed, you might want to break them into smaller, more manageable pieces. Nobody wants a choking hazard!
How Long Do These Carrot & Oat Dental Sticks Last?
Since these sticks aren’t baked, they rely on chilling to stay firm. They last really well in the refrigerator in an airtight container for about five days. If you make a huge batch—which I always do because Buster inhales them—pop the extras into a freezer-safe bag. They stay perfect in the freezer for up to two months. When you’re looking into commercial dental chew options, you’ll find the homemade shelf life is often better because we aren’t relying on heavy preservatives. If you want to compare shelf stability, you can check out information on popular choices like Greenies for dogs.

One last thing: if you notice any mold or they start smelling sour when you pull them from the fridge, toss them out immediately. Fresh is best!
Estimated Nutritional Snapshot of Carrot & Oat Dental Sticks
Now, since we skipped the ranch dip from the original carrot stick recipe idea and focused entirely on making dense, chewy Carrot & Oat Dental Sticks, these nutritional estimates are a bit different from the source data, but they still give us a great look at what we’ve made! I’m only calculating this based on the carrots, oats, yogurt, and lemon juice binding elements, so think of this as a rough guide, not a lab result.
This is what I love about making things clean—you have control! For me, knowing I’m providing something hearty without mystery fats is everything. You can explore the health benefits of other great alternatives like dog biscuits and their health benefits, but I promise these homemade ones are top-tier in simplicity.
Here is a very rough estimate *per serving* (assuming the recipe makes 4 servings of sticks):
- Calories: Around 180 calories (This will vary *heavily* based on the fat content of your Greek yogurt!)
- Fat: Roughly 5 to 10 grams (Mostly coming from the yogurt binder)
- Protein: About 8 grams (Thanks, Greek Yogurt!)
- Carbohydrates: Estimated at 25 grams (From the oats and carrots)
Remember, Buster doesn’t count calories like I do, but it’s still nice to know where the macros are landing when comparing homemade to commercial products. Enjoy seeing those simple numbers!

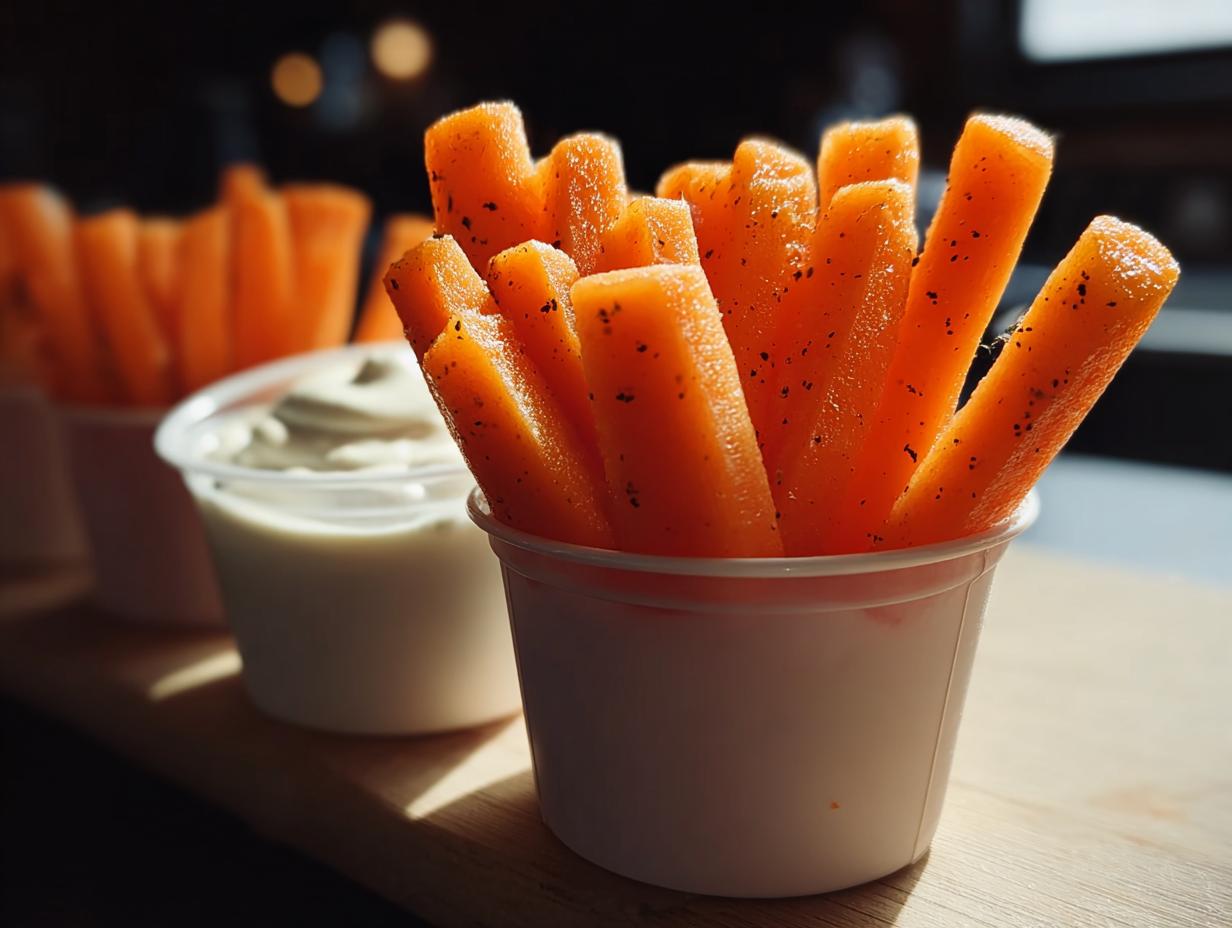
Carrot & Oat Dental Sticks
Ingredients
Equipment
Method
- Wash and peel carrots, then slice into uniform 3–4 inch sticks about 1/2 inch thick.
- Soak carrot sticks in ice water for 10 minutes to intensify the crunch, then drain and pat dry on paper towels for 1 minute.
- In a medium bowl, whisk together Greek yogurt and mayonnaise until smooth.
- Add dried dill, parsley, chives, garlic powder, onion powder, lemon juice, salt, and pepper, then stir until evenly distributed.
- Spoon 2 tablespoons of ranch dip into each small cup, then arrange carrot sticks upright around the edge.
- Serve immediately or refrigerate up to 2 hours.


