Okay, let’s talk about holiday baking, because honestly, if you’re not making something that looks like it belongs in a display case, are you even trying? I’m so excited to share these with you. Forget those boring old sugar cookies; we are diving headfirst into the magic of edible stained glass! These Snow Globe Cookies Dog treats are my absolute favorite new creation.
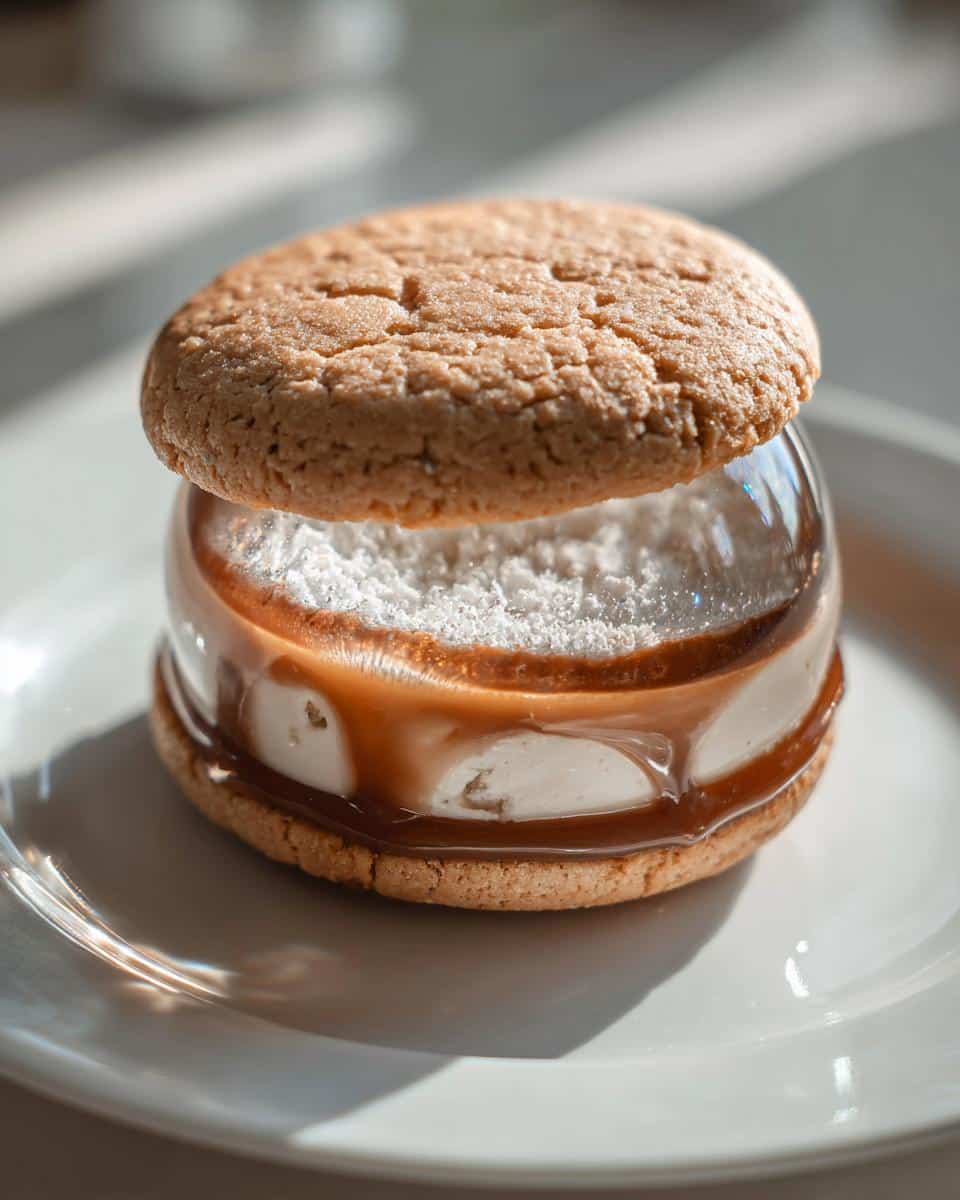
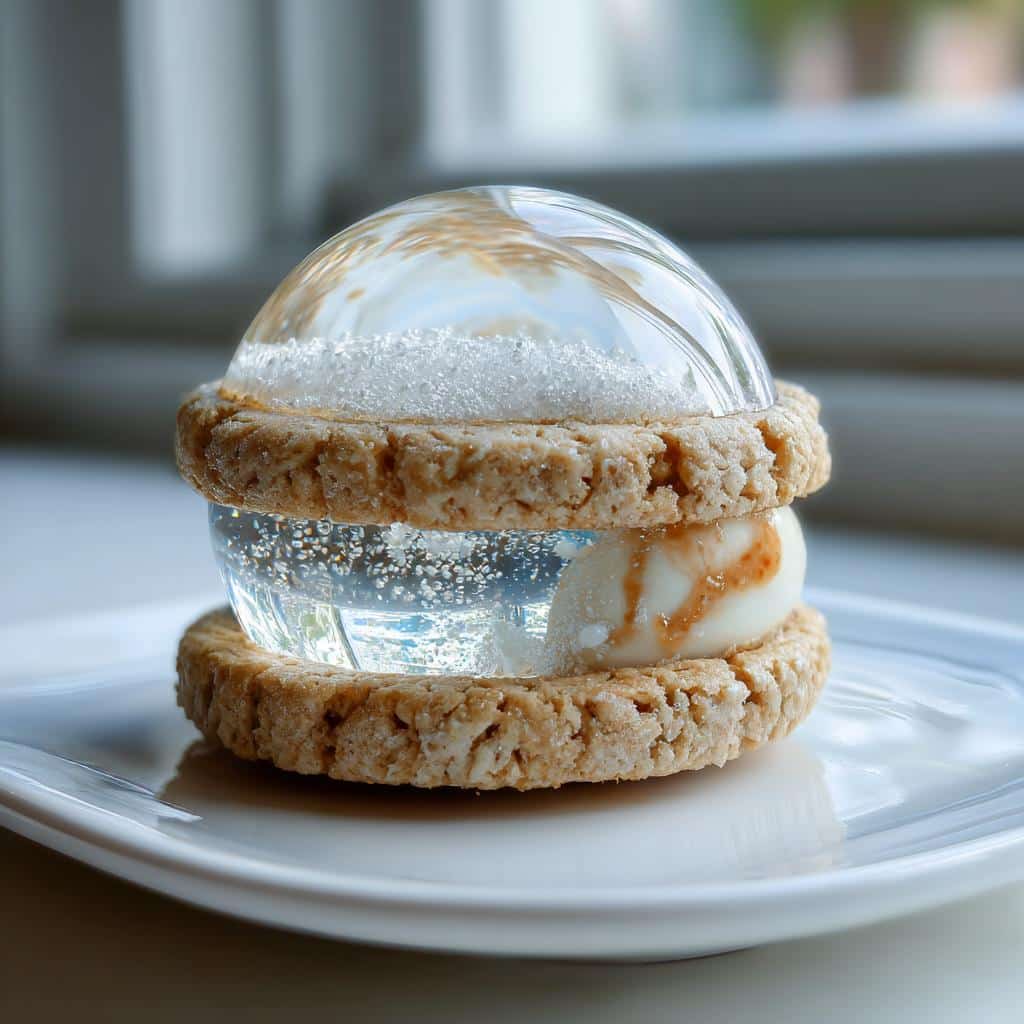
Imagine an adorable little dog shape, but instead of just icing, there’s this sparkling, clear window full of confetti that looks like it’s actually swirling around inside. It’s stunning! I made a batch for my sister last year, who is absolutely obsessed with her terrier, Gus, and she nearly cried when she saw them.
These aren’t as complicated as they look, I promise. We’re just layering two cookies together sandwich-style with melted hard candy in the middle. It’s pure genius, and once you see that clear center shine, you won’t want to stop. Trust me, these will be the showstoppers at any holiday party!
Why You Will Bake These Snow Globe Cookies Dog Treats
- The visual appeal is just unmatched; they look like professional bakery pieces.
- They are surprisingly durable for transport, unlike delicate iced cookies.
- It’s the perfect way to celebrate the dog lovers in your life.
- The candy center sets up beautifully clear when you follow the timing.
If you’re looking for more creative dog baking ideas, check out my roundup of fun holiday dog treats for inspiration!
Essential Equipment for Your Dog-Shaped Snow Globe Cookies
You don’t need a whole professional setup, thank goodness! But a few things are absolutely must-haves if you want those perfect cookie shapes. Obviously, you need sturdy mixing bowls and your reliable rolling pin. The most important part, though? Seriously good dog-shaped cookie cutters.
Since we are making a window, grab a smaller, round cutter too—that’s for the stained-glass hole! If you’re curious about using molds for other dog goodies, I have some tips here. Otherwise, just make sure you have a couple of clean baking sheets ready.
Gathering Ingredients for Perfect Snow Globe Cookies Dog Windows
Alright, ingredient time! We need two main groups here: the dough that forms the frame of our little doggy snow globes, and then the magical, clear filling. Every measurement matters here because we’re dealing with precise shapes, so grab your measuring cups and spoons!
Don’t worry, these aren’t crazy expensive ingredients. If you want to see how I handle measurements when making my brownie cookies, you’ll see I’m very strict about level cups. Here, we need that attention to detail so the dough rolls out nicely.
For the Cookie Dough
- All-purpose flour: Two and one-quarter cups, plus extra for dusting the counter—you’ll definitely need that extra flour!
- Baking powder: Just one tiny teaspoon.
- Salt: Half a teaspoon gives us just enough balance.
- Unsalted butter: You need a full cup, and it has to be softened. Not melted, softened!
- Granulated sugar: One cup exactly. Make sure it’s level in your measuring cup.
- Egg: One large one is perfect for binding everything.
- Vanilla extract: One teaspoon for that classic sugar cookie scent.
For the Filling
This is the ‘glass’ part, so clarity is everything! You need about 4 ounces of hard candies. Now, this is critical: choose clear, single-color candies like Jolly Ranchers or Life Savers. You have to crush them up really fine—think coarse sand or small pebbles. If they aren’t small enough, they won’t melt evenly into that beautiful, smooth window.
Step-by-Step Instructions for Dog Snow Globe Cookies
This is where the real fun starts! Getting the dough just right is half the battle, and chilling is non-negotiable. If you skip the chilling time, your dogs are going to spread out in the oven, and we’ll lose those cute little details. We need at least 60 minutes of chilling time total to keep those edges sharp!
My biggest tip while you work: If your kitchen is warm, work fast! If the dough starts feeling soft or sticky while you’re rolling, pop it back into the fridge for ten minutes. You want firm dough for perfect cutouts!
Preparing the Cookie Dough Base
First things first, let’s get our dry team assembled. Whisk together the flour, baking powder, and that half teaspoon of salt in a medium bowl. Set that bowl aside, it’s waiting its turn.
Now for the wet side! Grab your big bowl and beat that softened butter with the cup of sugar until it really looks light and fluffy—I mean actually paler yellow. Beat in that single egg and the vanilla. You want it creamy!
Next, we combine! Gradually add those dry ingredients to the wet mixture. Do not overmix! Mix it only until you see that last streak of flour disappear. Seriously, stop the mixer right there. Overmixing leads to tough cookies, and we want tender edges for our snow globes.
Once it’s just combined into a stiff dough, divide it right in half. Flatten each half into a nice, thick disk—this makes rolling easier later. Wrap them up tight in plastic wrap and pop them into the fridge for at least 30 minutes. That’s the first chill done!
Cutting and Filling Your Dog Snow Globe Cookies
Time to set up the baking station. Preheat your oven to 350°F (175°C), and line those baking sheets with parchment paper. This parchment is your best friend for easy cleanup!
Take one disk of dough out—keep the other one chilling! Roll it out on a lightly floured surface until it’s about 1/4 inch thick. Now, take your dog-shaped cutter and start making shapes. You’ll need two of every dog: one solid base, and one ‘top.’ Take that smaller round cutter and cut a window right out of the center of half of your dogs.
Put all your solid dog shapes and all your windowed dog shapes onto the lined sheets. Give them another quick trip to the fridge for 15 minutes. This second chill is why your edges stay perfect!
Now, take out the windowed pieces. Gently place your crushed hard candies right into the clear window space. You need to fill that hole completely—no gaps! That candy is what creates your beautiful, clear ‘glass’ effect when it melts.
Baking and Assembling the Snow Globe Cookies Dog Design
Pop those trays into your preheated oven. Bake them for about 10 to 12 minutes. You’re watching for two things: the cookie edges should turn just a tiny bit golden, and the candy needs to be completely melted and looking clear. Be super careful here; burnt candy tastes gross!
This next part has to happen fast, which is why it’s so fun! As soon as you pull the cookies out, you need to work quickly. Place one solid dog shape directly on top of the hot, melted candy cookie. Press down *gently* all around the edges so the dough seals to the other dough piece.
The melted candy will squish a little, which is fine! Leave them completely untouched on the baking sheet as they cool down. As that candy cools, it hardens and permanently bonds the two dog layers together. Don’t try to move them until they are totally firm, or you might smoosh your beautiful snow globe effect. For more baking guidance on easy creations, have a look at my post on easy pup kitchen creations!
Tips for Success Making Dog-Shaped Snow Globe Cookies
You’re going to nail this, but let me give you the insider scoop so you don’t end up with melted candy disasters—we all have those days!
The quickest way to ruin the ‘snow globe’ effect is letting the candy spread too thin. Make sure those candy piles are mounded up nicely in the window before baking. If the candy does try to creep out past the edges, don’t panic while it’s hot! Wait until the entire cookie is completely cool. Once that candy is set hard as a rock, you can usually take a small, sharp paring knife and carefully trim away any excess that strayed onto the cookie dough border.
Also, for that perfect clear glass, humidity is your enemy. Keep your candies sealed up tight until the moment you need them. If things look cloudy, it usually means too much moisture in the air or the candy wasn’t crushed finely enough to melt evenly.
For general baking wisdom that applies everywhere, pop over and read my latest baking blog post. These dog shapes are fragile, so handle them gently once cooled!
Variations for Your Snow Globe Cookies Dog Recipe
Now that we’ve got the basic dog shape down, the fun part is customizing! This recipe is so flexible, you can turn these into any kind of playful design you want, even beyond the cute dog shapes we focused on.
If you’re tired of plain clear glass, try making multicolored ‘snow’ inside! Instead of using just clear Jolly Ranchers, crush up small amounts of red and green candies together. When they melt, you get this beautiful confetti look inside the window. It’s amazing, and it really elevates the look.
You can also play with the dough itself for added texture or sparkle. For a truly dazzling effect, before you chill the dough, fold in just a tiny pinch of edible silver or gold glitter. Don’t go crazy, or it might feel gritty, but a little bit catches the light beautifully when you look through the glass!
And of course, you don’t have to stick to dogs! If you want to make these for a cat-loving friend, you just need a sturdy cat-shaped cutter. The construction method stays exactly the same. It’s all about those two cookie layers and the gooey middle!
If you want some other fun ideas about changing up shapes for holidays, you can browse what other people are doing on my page featuring holiday and everyday homemade food ideas, even though these cookies are strictly for us humans!
Storage and Reheating Instructions for Snow Globe Cookies Dog Treats
Because we have that glorious candy center, keeping these crisp is the main goal! Once your cookies are completely cool and the candy is hard, you have to store them correctly. Humidity is the sneaky culprit that turns that beautiful clear glass cloudy. You absolutely must keep these in an airtight container.
Stack them with layers of wax paper in between so the melted glass doesn’t scratch. I wouldn’t try to microwave these to ‘reheat’ them—the candy will just get sticky fast! If they start to soften, just leave them on the counter for a few hours; they usually crisp right back up. For more storage tips on keeping tricky baked goods fresh, check out my guide on chewy French toast cookies; the principles are similar!
Frequently Asked Questions About Dog Snow Globe Cookies
I get asked so many questions about these cookies! People see them, and they immediately want to know the little “how-to” secrets. Don’t you worry; I’ve gathered the questions I hear most often about making the perfect window and keeping the dough manageable.
Are these Snow Globe Cookies Dog treats safe for my dog to eat?
Oh, this is the most important question when you have a dog-shaped treat! I need to be super clear here: Nope, these are absolutely not safe for your dog. While they are shaped like adorable pups, this recipe is loaded with refined white sugar and flour—it’s strictly for human enjoyment! If you are looking for recipes your pup can actually crunch on, I have a great starting point in my collection of easy dog treats.
What kind of dog-shaped cookie cutters work best?
You want cutters that are rigid, like sturdy metal ones. Plastic cutters sometimes have slightly rounded edges, and that small detail matters when you have to seal two pieces together! For the best look, use a cutter that has defined lines rather than a really complex silhouette. Clean, sharp edges are key because they need to meet up perfectly when you press the top cookie onto the hot, melted candy base. If the edges are jaggy, the melted candy might leak out too much during assembly.
Why is the candy center cloudy instead of clear?
A cloudy center drives me crazy! Usually, this happens for one of two boring reasons. First, humidity! If it’s raining or super humid outside, the melted sugar absorbs moisture while it cools, making it look foggy instead of like glass. Second, if your hard candies weren’t crushed finely enough, they don’t melt into a smooth sheet; you get little pockets that trap air and look cloudy. My best preventative tip is to use only the whitest, clearest candies you can find and crush them in a sturdy bag with a heavy rolling pin until they feel almost like sugar.
Estimated Nutritional Information for Snow Globe Cookies Dog Recipe
Now, since these are treats loaded with sugar and butter—they are special occasion cookies, after all!—I always like to look at the numbers, even if I’m not counting every single bite. This information is based on making 12 cookies exactly, using standard supermarket ingredients.
Keep in mind that because we are using hard candies and homemade dough, these figures are an estimate based on standard calculations. Your actual results might vary slightly depending on the brand of butter or the amount of candy you manage to pack into the window! If you want to see some of my other recipes with nutritional breakdowns, I have a great list of easy appetizers and snack ideas.
Here’s the breakdown per cookie:
- Calories: 180
- Fat: 8g (Saturated Fat: 5g)
- Cholesterol: 25mg
- Sodium: 100mg
- Carbohydrates: 25g (Sugar: 15g)
- Protein: 2g
- Iron: 0%
So yes, they are a sweet indulgence! Just remember this is just an estimate based on the standard components of the dough and the candy filling. Enjoy them responsibly!
Dog Snow Globe Cookies
Ingredients
Equipment
Method
- Whisk together the flour, baking powder, and salt in a medium bowl. Set this aside.
- In a large bowl, beat the softened butter and sugar together until light and fluffy. Beat in the egg and vanilla extract until combined.
- Gradually add the dry ingredients to the wet ingredients, mixing until just combined to form a stiff dough.
- Divide the dough in half, flatten each half into a disk, wrap in plastic, and chill for at least 30 minutes.
- Preheat your oven to 350°F (175°C). Line baking sheets with parchment paper.
- On a lightly floured surface, roll out one disk of dough to about 1/4 inch thickness. Use a dog-shaped cookie cutter to cut out shapes. For each dog shape, use a small round cutter to cut a window in the center of half of the shapes.
- Place the solid dog shapes and the windowed dog shapes onto the prepared baking sheets. Chill the cutouts for 15 minutes.
- Place the crushed hard candies into the center window of the windowed cookies. Fill the space completely.
- Bake for 10 to 12 minutes, or until the edges are lightly golden and the candy is completely melted and clear. Watch carefully to prevent burning.
- Remove the cookies from the oven. Immediately place the solid dog cookie on top of the melted candy cookie, pressing gently to seal the edges. The melted candy will adhere the two layers together as it cools.
- Let the assembled cookies cool completely on the baking sheet before moving them. This allows the candy center to set firmly.


