Oh my gosh, when the summer heat hits and you need something instantly cool but don’t want to turn on the oven? I have the lifesaver recipe for you. Seriously, these **Frozen Banana & Yogurt** bites saved my sanity last week when the AC decided to take a vacation. Forget complicated ice cream makers or long chilling times; this is truly the easiest cool treat you will ever make.
I’m talking three ingredients—maybe four if you sneak in a little honey—and about ten minutes of actual work before they head to the freezer. They come out firm, creamy, and just sweet enough. They’re perfect for those afternoons when you need a guilt-free snack that tastes like dessert. Trust me, stocking your freezer with these **Frozen Banana & Yogurt** delights is the smartest thing you’ll do all season.
Why You Should Make These Frozen Banana & Yogurt Bites
If you need convincing that this recipe is worth the few minutes of prep, let me tell you why these treats end up in my freezer every single week. They are totally worth keeping on rotation!
- They are shockingly fast to assemble! You really only spend about 10 minutes actively working before they go into the freezer for their nap.
- We are talking serious simplicity here—three core ingredients, and you probably have them sitting on your counter right now. No weird specialty items needed.
- They are fantastic for cutting down on sugary processed desserts. It’s fruit and yogurt, folks! A much better way to satisfy that sweet craving.
- I love that they work for everyone. They are naturally gluten-free, and you can easily make them dairy-free if you swap the Greek yogurt for a coconut alternative.
- Portion control is built right in! Since you’re dipping individual slices, you know exactly how much you are grabbing when you reach into the freezer for a quick frozen snack.
Essential Ingredients for Perfect Frozen Banana & Yogurt
Okay, gathering your ingredients is the next big step, and honestly, half the reason this recipe is so good is because the ingredient list is short and sweet. You want to pay close attention to the ripeness of your bananas—that makes a huge difference in the final texture of your frozen banana & yogurt base. Don’t try to substitute the Greek yogurt here; its thickness is exactly what we need for a great coating!
For the Frozen Banana & Yogurt Base
For the main part of these bites, you just need three things. Make sure you grab those bananas when they are nice and spotty—that means they’re perfectly sweet for freezing.
- 3 large Bananas: Please make sure they are ripe! We are looking for those nice brown freckles, not green ones.
- 1 cup Greek yogurt: I prefer plain or a simple vanilla flavor. The thickness is key, so definitely stick to Greek!
- 2 tbsp Honey or maple syrup: This is optional, but it really balances out the tartness of the yogurt beautifully.
Optional Coatings for Your Frozen Banana & Yogurt
This is where you can totally go a little wild! These coatings are completely optional, but they turn your simple healthy snack into a real treat. If you skip these, your frozen banana & yogurt treats are still amazing!
- 1/4 cup Chocolate chips: You’ll need to melt these down slightly before dipping.
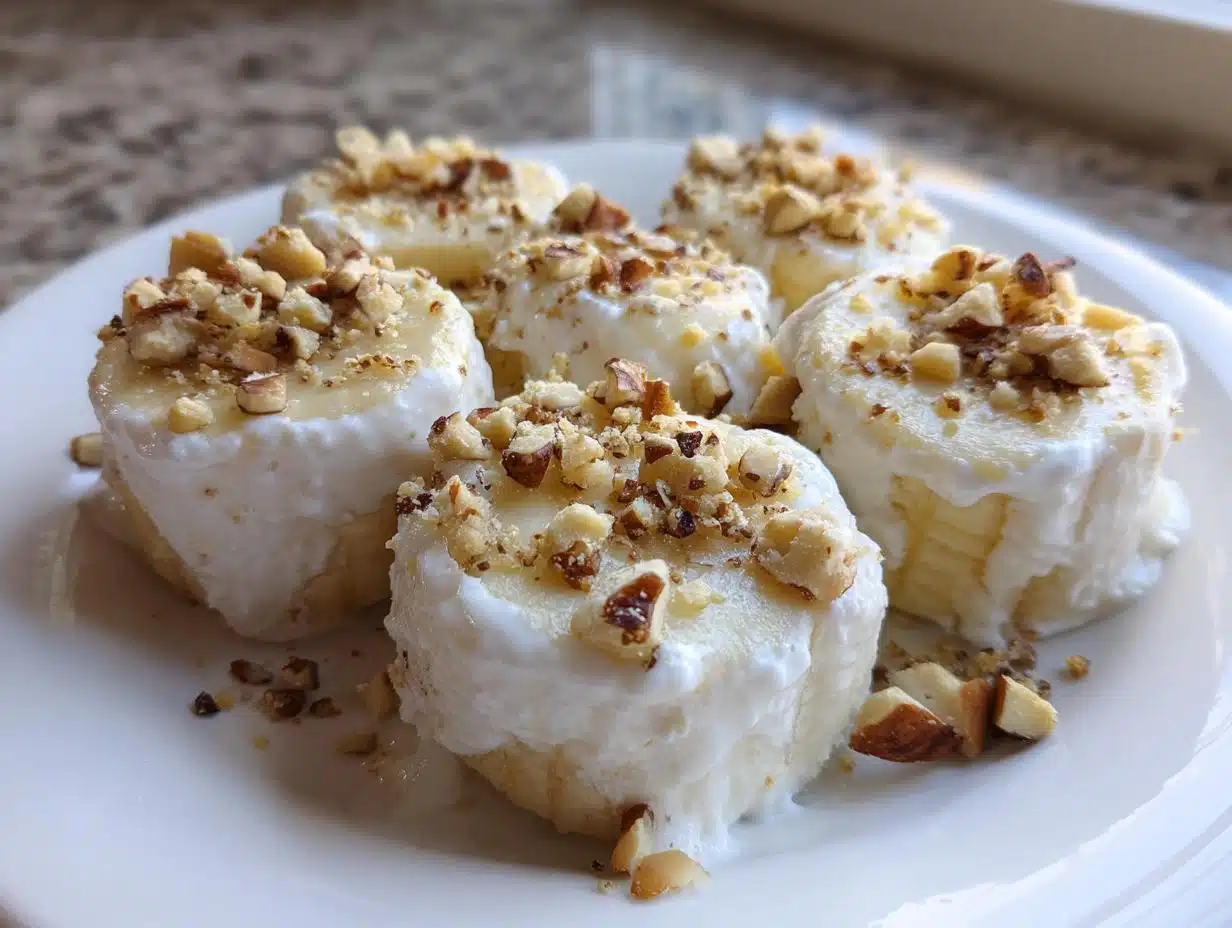
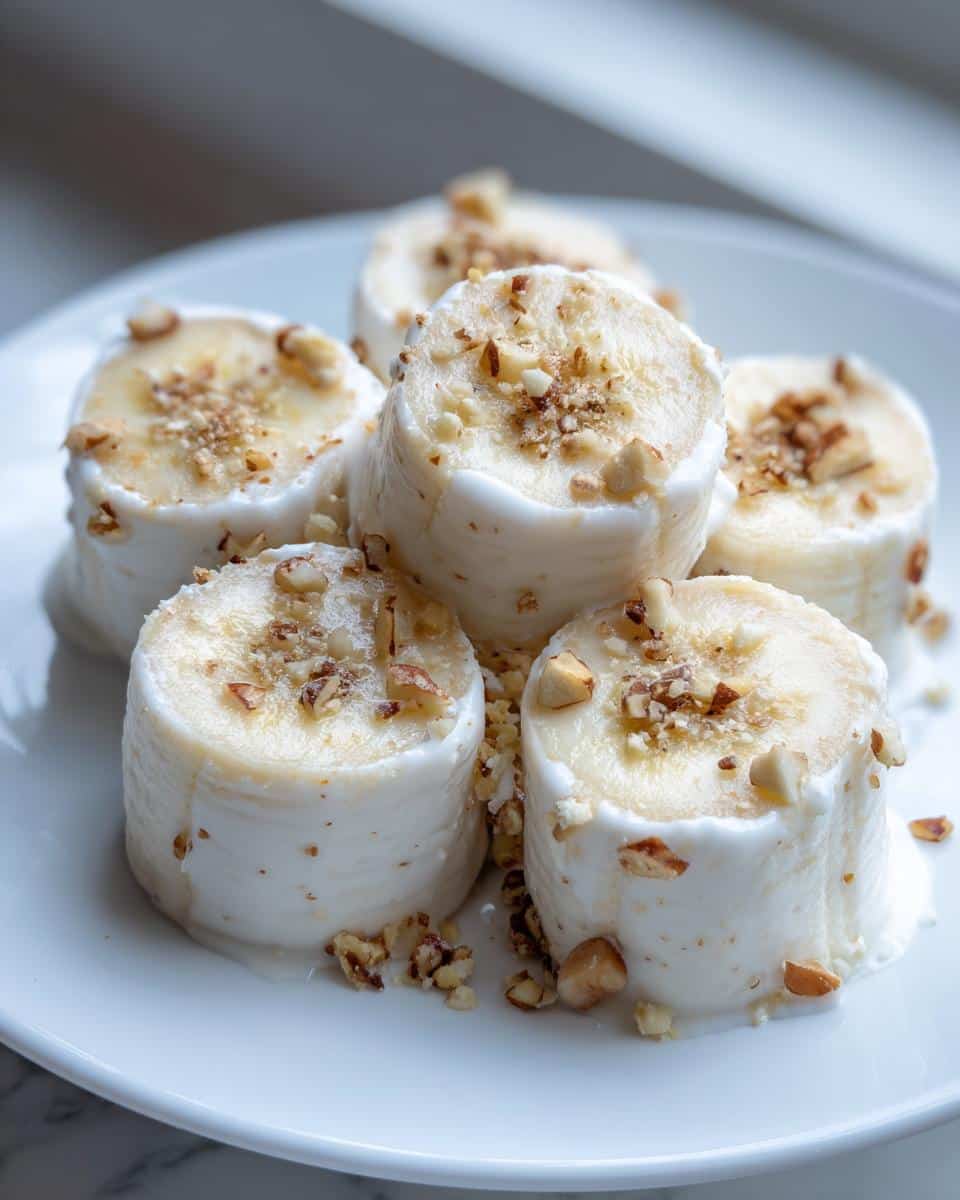
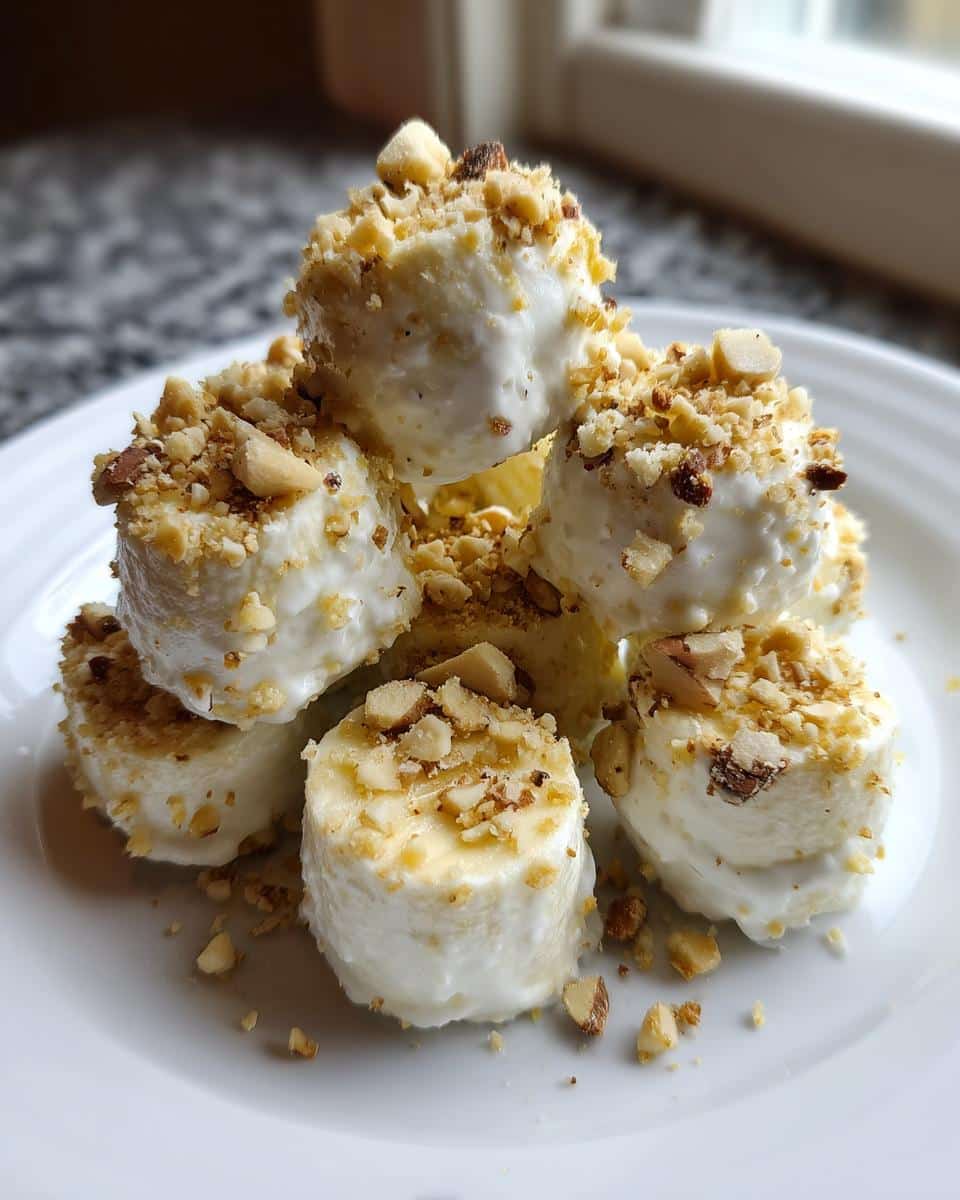
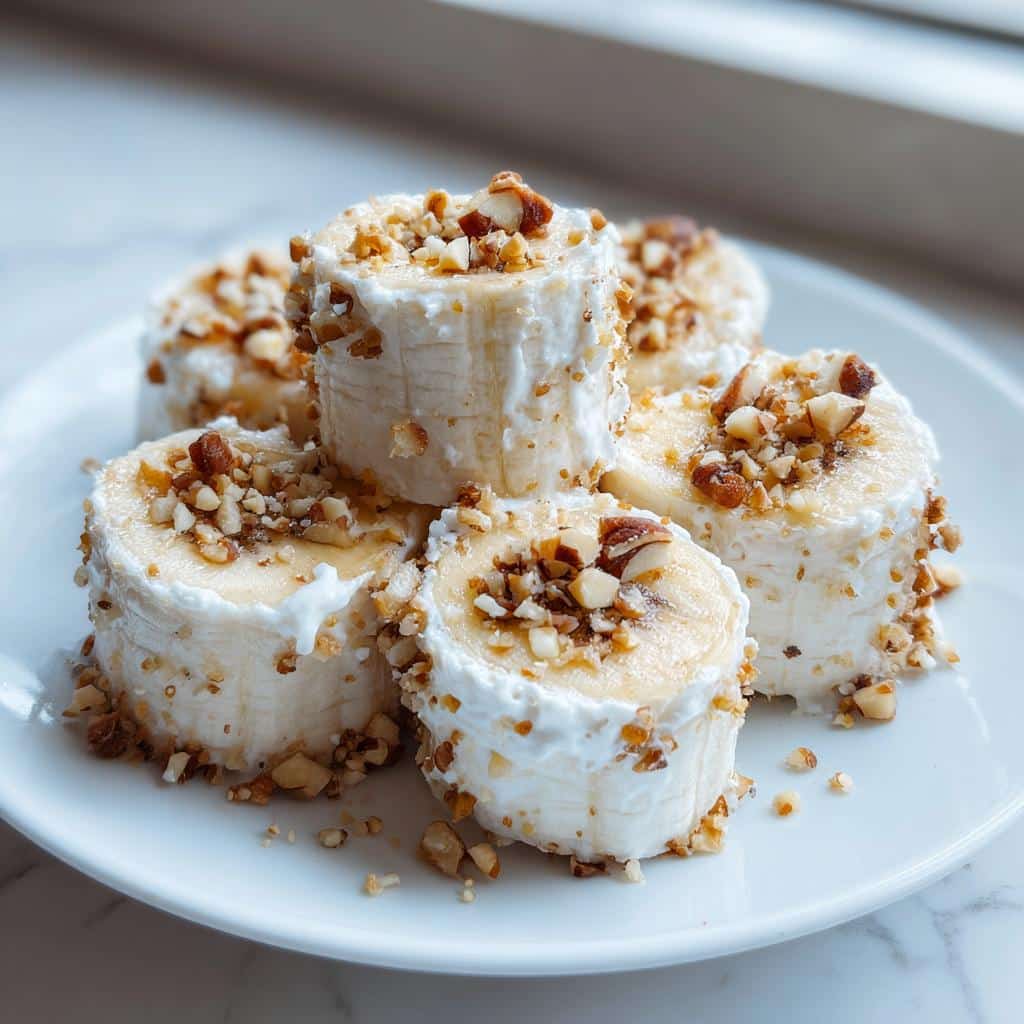
- 1/4 cup Chopped nuts: Any kind works, but lightly toasting them first really wakes up the flavor!
Equipment Needed for Your Frozen Banana & Yogurt Recipe
You know, another reason I adore this recipe is that it doesn’t require any fancy gadgets. No stand mixer needed, no specialized molds—just the basics you already have sitting in your kitchen drawers! Setting up your station is half the battle when you’re making something that freezes, so let’s get organized. Grab these three things, and you’ll be ready to dip.
First up, you absolutely need a flat surface to set your coated banana slices on. That means a baking sheet is essential. Make sure it’s one that actually fits well in your freezer, or you’ll be juggling it precariously!
To prevent our lovely yogurt-coated bananas from gluing themselves permanently to that shiny sheet, we use parchment paper. Don’t even think about using wax paper here; the cold will make it stick horribly. Parchment paper is your best friend for easy release.
Finally, grab a small bowl for mixing up your yogurt and sweetener. It just needs to be big enough to comfortably dip half a banana slice at a time. See? Minimum fuss, maximum treat!
Step-by-Step Instructions for Making Frozen Banana & Yogurt Bites
Okay, time to put the assembly line together! Once you have your equipment ready and your ingredients prepped, making your **Frozen Banana & Yogurt** bites is almost game time. Remember, the colder everything is, the better the yogurt holds its shape, so let’s move efficiently but carefully so we don’t make a huge mess.
If you find your bananas are a little too soft, here’s a great trick I learned. Before you dip them in the yogurt mixture, pop those banana slices onto the parchment paper and give them about 30 minutes in the freezer just to firm up. This helps them hold their shape better when they get coated, giving you a much thicker layer of yummy yogurt! While you wait, you might want to check out some other great tips on my blog here.
Preparing the Banana Slices and Yogurt Dip for Frozen Banana & Yogurt
First things first, get that baking sheet ready by lining it perfectly with that parchment paper we talked about. You don’t want any sticking later, I promise! Next, peel those ripe bananas—the sweeter the better—and slice them up into rounds that are about a half-inch thick. Try to keep them uniform so they freeze evenly.
In that small bowl, whisk together your Greek yogurt and whatever sweetener you chose, like honey. I always taste it right here—make sure it’s sweet enough for your liking before it touches the fruit. If you’re looking for more easy appetizer ideas to serve alongside these tasty bites, you should definitely check out the quick recipes I’ve posted over at here!
Coating and Freezing Your Frozen Banana & Yogurt
Now for the fun part! Take each banana slice and dip it right into that yogurt mixture. You want both sides coated, but don’t make it too heavy, or it’ll slide off when frozen. Use a spoon to help gently cover any bare spots. Place the coated slices onto your prepared baking sheet, making sure there’s a little space between each one.

If you decided to go for the toppings, now is the moment! Drizzle those melted chocolate chips or sprinkle on your chopped nuts immediately. Seriously, do this right away because the yogurt starts to set fast. Once they are all dressed up, transfer that whole sheet carefully into the freezer. They need a minimum of 3 hours to get completely solid, so plan ahead! Once rock-hard, transfer them to a proper freezer container for storage.
Tips for Perfect Frozen Banana & Yogurt Consistency
A lot of people probably think making these is just dipping and tossing them in the freezer, but getting that perfect, creamy-yet-frozen texture when you bite into them takes just a tiny bit of know-how. It all comes down to what you start with!
Let’s talk ripeness first because it’s honestly the most important factor. If you use firm, slightly green bananas, they will freeze rock hard and taste pretty bland. You want those bananas firm enough to hold their shape once sliced, but sweet enough inside that they naturally start to soften slightly when you eat them frozen. Aim for that sweet spot right before they get mushy for slicing.
The yogurt thickness is next on my list of secrets. If you use a very thin, runny yogurt, it will either slide right off or freeze into a thin, icy shell. That’s why Greek yogurt works like a charm; it’s naturally thicker. If you ever find yourself with a thinner yogurt, try this trick: take your sliced bananas and put them on the tray for just 20 minutes first. That little chill helps the banana surface grab onto the wet yogurt mixture way better, resulting in a thicker coating before it even hits the deep freeze.

And we already talked about the parchment paper, but I wanted to mention it again in the context of sticking. If you skip the parchment paper, you’re practically guaranteed to lose a bite or two when trying to pry them off the metal pan. Keep some parchment on hand, and if you’re prepping a big batch, make sure you layer cookies sheets separated by something—like balled-up pieces of parchment—so they don’t freeze together in one giant clump! For more little helpful hints like this, stop by my main blog page any time!
Storing Your Homemade Frozen Banana & Yogurt Treats
Once you have painstakingly coated and frozen your magnificent batches of banana and yogurt goodness, you can’t just leave them sitting out on the baking sheet! The absolute worst is when you go to grab one later and it’s freezer-burned or covered in frost crystals.
The key here is containment and getting them off that parchment paper and into a proper home quickly. As soon as those bites are completely solid—and I mean rock-hard so they don’t smear when you touch them—it’s time to transfer them. This is the final step, and it guarantees your **Frozen Banana & Yogurt** stays delicious.
You absolutely need an airtight container or a good quality freezer bag. If you use a bag, make sure you squeeze out as much air as you possibly can before sealing it up tight. If they are touching each other in the container, that’s okay once they are frozen solid, but try not to stack them too high right away until they’ve had a chance to firm up individually for an hour.
Honestly, these treats keep really well in a properly sealed container. If you don’t have too many crazy toppings that melt easily, they stay perfect for about a month. After that, the texture might start to change slightly, but they’ll still taste great for about 6 weeks. Just try not to keep them longer than necessary, because honestly, they disappear so fast around my house, I never have to worry about month-long storage!
Variations on the Classic Frozen Banana & Yogurt
Part of the fun of this wonderfully simple **Frozen Banana & Yogurt** recipe is how many ways you can tweak it without hardly adding any effort. If you’re finding you’re making them every week like I do, you’ll want to mix things up so you don’t get bored. The base is so foolproof, it handles all sorts of flavor additions beautifully!
The quickest way to change the whole vibe is by changing the yogurt flavor. If you use strawberry or blueberry Greek yogurt instead of plain, you instantly get those fruit swirls mixed right into the coating. It’s like getting a whole new treat for the same 10 minutes of work!
I also love experimenting with spices right inside that yogurt dip. A tiny pinch of cinnamon or pumpkin pie spice makes these taste totally autumnal, even though they’re frozen! It’s amazing how warm spice blends with the sweet banana.
For toppings, we already mentioned nuts and chocolate, but you can get so much more creative. Try dipping the yogurt-coated bananas into crushed graham crackers for a cheesecake vibe, or maybe some toasted coconut flakes—hello, tropical treat! If you’re looking for other fun frozen ideas, check out the recipe for those strawberry oat smoothie sticks I posted last week; they have a similar vibe but use different fruit!
Another fun twist is playing with the banana slices themselves. Try rolling the banana rounds in crushed freeze-dried strawberries *before* you dip them in the yogurt. That gives you an intense berry flavor layer that is just incredible when frozen hard. Keeping your **Frozen Banana & Yogurt** simple is great, but knowing you can dress them up makes batch prepping even better!
Frequently Asked Questions About Frozen Banana & Yogurt
I totally get it; when you find a recipe you love, you immediately start wondering about the little tweaks and potential pitfalls. I’ve answered the top things I always hear from people making these **Frozen Banana & Yogurt** treats for the first time below. Hopefully, this covers everything so you can get dipping!
If you have other baking questions, you know I love chatting about kitchen struggles over on my main blog page any time!
Can I use regular yogurt instead of Greek yogurt for this Frozen Banana & Yogurt recipe?
You absolutely *can*, but be warned: you’re going to get a much messier result. Regular, thinner yogurt tends to just run right off the banana slice, leaving you with a barely-there coating. Greek yogurt is naturally much thicker, which means it clings beautifully and gives you that nice, creamy layer we want. If you only have regular yogurt, try draining it in a fine-mesh sieve lined with cheesecloth for about an hour first. That gets rid of the extra liquid and thickens it up nicely for this great **frozen snack**.
How long do these Frozen Banana & Yogurt bites last in the freezer?
Since we aren’t using a lot of stabilizers or added sugars, they are definitely best eaten relatively soon, but if you store them correctly, they last quite a while! If you transfer them immediately to a well-sealed, airtight container or heavy-duty freezer bag (make sure to press out all that air!), they stay perfectly delicious for about 6 to 8 weeks. Beyond that, the texture might start to go a little downhill, but honestly, my freezer is usually empty long before two weeks are up because they are too good to save!
Is this an easy dessert option for kids to help make?
Yes, yes, and a thousand times yes! This is one of my favorite **easy dessert** recipes to do with my nieces and nephews. They absolutely love the dipping part, and it’s a great way to practice dipping coordination without worrying about making a huge mess since the yogurt is going to coat something anyway! The best part for the kids is sprinkling on the chocolate chips or any little toppings you choose right after dipping. It gives them ownership over their custom frozen banana & yogurt bite!
Share Your Frozen Banana & Yogurt Creations
Whew! That’s it—you made it through the whole recipe! Now that you have a freezer full of these amazing, cool, and creamy **Frozen Banana & Yogurt** bites, I absolutely want to hear about them. Don’t just make good food; share the joy!
Did you try the melted chocolate topping, or did you sneak some cinnamon into the yogurt dip? Tell me everything! I love seeing how you make this simple base recipe your own. Drop a comment below and let me know how they turned out. Seriously, your feedback helps me know if I need to adjust my instructions for the next person who tries this easy dessert.
If you took a gorgeous picture of your perfectly coated, frozen treats—maybe you arranged them nicely for a snack platter—please share it! You can tag me on social media (and yes, I always check those tags; it makes my day!). Or, if you just want to leave a quick star rating at the bottom of this post, that’s fantastic too. Knowing that these little bites brought some cool relief to your hot afternoon makes all the recipe testing worth it. Keep baking, keep experimenting, and don’t forget to revisit the tips over on my main blog page whenever you need a little extra kitchen inspiration!
Frozen Banana and Yogurt Bites
Ingredients
Equipment
Method
- Line a baking sheet with parchment paper.
- Peel the bananas and slice them into rounds about 1/2 inch thick.
- In a small bowl, mix the Greek yogurt and honey or maple syrup, if using.
- Dip each banana slice into the yogurt mixture, coating both sides lightly. You may need to use a spoon to help cover them.
- Place the coated banana slices onto the prepared baking sheet.
- If using coatings, immediately sprinkle the tops with melted chocolate chips or chopped nuts before they freeze.
- Place the baking sheet in the freezer for at least 3 hours, or until completely solid.
- Transfer the frozen bites to an airtight container or freezer bag for storage.